UK/EU▾
Your Cart is Empty


How Do You Secure a Dirt Bike on a Trailer?

Whether you race motocross professionally, or just take your bike out for fun, riding a dirt bike is a thrilling and addicting hobby. But transporting your bike safely can be a difficult task.
To secure your dirt bike on a trailer, make sure your truck and trailer is parked in a flat area. Roll the dirt bike up the ramp and onto the trailer. Grab your tie-down straps and pin it down from all four corners or roll it into your moto transport system and lock it into place.
For in-depth instructions on how to secure your dirt bike with straps, keep reading. We’ll also take a look at popular and efficient bike transport systems that make securing your bike a breeze without the use of tie-down straps.
Assemble Materials: Straps, Ties, or Gear
The first step when securing your dirt bike onto a trailer is to assemble all your materials. Make sure you have the right straps, ties, or gear. Your straps should be 1-½” thick. This thickness will ensure that your straps can handle the heavy weight of your bike.
If you are using straps, be sure to have the correct kind. It is recommended to have four nylon tie-down straps, with cam buckles or ratchets. These straps will work well for most standard-sized dirt bikes.

Although both cam buckles and ratchets will work, straps with ratchets are much preferred. Ratchet straps are stronger and more durable. They can bear the load of your bike. By using the leverage of the gearing and tensioner handle, they can also “clamp down tighter” than cam buckle straps.
That being said, cam buckle straps are faster to tighten and release and are more commonly used to transport lighter dirt bikes. Most people actually only use two cam buckle straps on dirt bikes. This is common and acceptable, but it does allow the back end of the bike to wander on rough roads.
Generally, ratchet straps are recommended for heavy motorcycles, while cam buckle straps are better for transporting lighter, smaller motorcycles.

When using only two tie-down straps, you must have your front tire in something or against something, like the truck or trailer wall. You may also want to use a wheel chock. It’s not mandatory, but it will help keep your bike in place and prevents your front wheel from turning during transport.
Read on for a step-by-step guide for the safest way to strap down your motorcycle using four tie-down straps.
Attach Your Straps in the Trailer

The next step is to lay your straps out on the trailer. You will need four straps in total to make sure that your dirt bike is fully secure. Two straps will go in the front of the trailer, and two straps will go in the rear.
You will want to attach the lower part of the strap to the trailer hooks. Let the slack end of the straps dangle onto the trailer floor so that you can easily grab them once your bike is loaded onto the trailer.
Make sure the connection points you attach to the straps are at the front and rear of the trailer. If your trailer has sidewalls, do not hook up your straps to those sidewalls. If you have a strap angle of more than 45 degrees, it can begin to compromise the strap’s efficiency.
Load Your Bike
Now it is time to load your bike onto the trailer. Use the trailer ramp, and push your bike up onto the trailer. For the inexperienced, or with large heavy motorcycles, it can help to have an extra pair of hands for this part. One person can push the bike from the rear, while the other person controls the bike and pushes from the handlebars.
If your motorcycle has a kickstand, feel free to use it while you prepare your straps, but don’t strap your bike down with it leaning on the kickstand. If you don’t have a kickstand you will learn that using tie-down strap requires you to perform circus acts and be very flexible to hold your bike and reach all straps. Of course, it is possible, and often funny to watch, but if someone is just sitting, watching and laughing, you might ask them to hold your bike while you position the tie-down straps.
Secure the Front of the Bike
This is an essential step to ensure your bike stays safe during transport. Take care with this step. Use the straps to secure your bike.

Hook the tie-down straps straight onto the handlebars to tie them down. Alternatively, you can loop the straps over the handlebars and slip the trailer hook into the loop at the end of the strap. The method you choose will depend on what kind of tie-down straps you own.
To ensure that your bike is safe and secure, it is important to secure the front tire. You don’t want your bike moving or rolling around during transport. If you are frequently transporting your bike, it may be worth it to invest in a wheel chock.
A wheel chock is an extremely convenient way to secure your front tire. It can be expensive, and you have to install it into your trailer, but it is an effective method. And once it is installed, you won’t have to bother with extra straps.
Wheel chocks are made from either plastic, rubber, or metal, and will make sure your dirt bike is completely immobilized while you are transporting it.
Secure the Rear of the Bike
Once the front of your bike is secured, use the remaining straps to tie down the rear of the bike. Attach the straps to the end of your motorcycle frame.
Be sure to attach the straps to a sturdy part of the bike. It’s essential that you attach the straps to the motorcycle frame itself, and not any auxiliary or attached parts. The tie-down straps will simply tear off any non-permanent pieces.
You will want to fasten these two straps with even tension. These back straps will help keep your bike secure during transportation.
Compress your suspension when tensioning the tie-down straps to ensure a bump in the road won’t compress the suspension, loosen the tension on the strap, and cause the hook to fall off.
Ratchet the Front of the Bike Down
When tightening the tie-down straps on the front of your bike, It is imperative that your bike stands vertically straight and immobile.
Pull, or ratchet, the front tie-downs until the bike is secured vertically. Compress the forks. This will eliminate the travel in the suspension. If the suspension is too loose, your bike will bounce and jostle as you drive. A loose suspension can also release your tie-down hooks, which would be very bad.

Ratchet the Rear of the Bike Down
Many people only secure the front of the bike, but the safest method is to secure the back of the bike as well. To prevent the back of the bike from moving around, attach the rear tie-down straps. Ratchet each side slightly, rotating in a circle. You will want to do a little at a time to make sure the suspension is balanced between all four straps.
If you are using cam buckles instead of ratchets, this step will take a little more work. Use your body weight to make sure the straps are as tight as possible.
Examine Your Bike
At this stage, you will want to examine your bike to make sure it is sitting vertically. It should be perfectly level.
If your bike happens to be leaning to one side, you need to loosen the straps and repeat the last step. It is important to make sure that the suspension is taut and that the bike is vertical to prevent any damage from occurring.
Shake Your Bike
To double-check that your bike is secure, you will want to shake the bike. Grab the handlebars and roughly jostle your bike. Even if you pull and tug, your bike should not move. A secure bike will act as part of the trailer itself, and should not move separately.
If the bike moves or seems loose, you should try again. If your bike stays in place, then you are good to go!
Key Points for Securing Your Dirt Bike on a Trailer
If you’re curious about transporting your dirt bike on a truck, the steps are similar, albeit slightly different. Here are step-by-step instructions you should take on how to secure your dirt bike into a truck.
Securing Your Dirt Bike Into Your Truck
Park Your Truck in a Flat Area
This is the first essential step in securing your dirt bike. Making sure your truck bed is flat will make the whole process much easier, and will make sure your dirt bike doesn’t roll off your truck bed as you try to load it.
Attach Your Truck Ramp
The next step is to get your ramp ready. Make sure it is secured at the end of your tailgate.
You may have to use straps to tie down and secure the ramp to your truck. The last thing you want is for the ramp to slide on you with your bike only halfway up in the truck bed.
Prepare Your Tie-down Straps
If you are using tie-down straps to secure your bikes, you will want to position them before loading your bike. This makes the circus act of attaching the straps to your bike much easier because you will have to hold your bike in place as you scramble for your straps.
Put Your Bike in Neutral
This is an essential step to make sure that the whole process goes smoothly. Be sure to put your dirt bike in neutral.
Push the Bike Up the Ramp
When loading a dirt bike into the back of a truck, it can be done by one person, but this step is always much easier when you have help. One person should be on the ground, pushing the bike upwards, while the second person should be standing in the truck, pulling the dirt bike up and into the truck bed. A loading buddy is especially helpful in lifted trucks.

If loading by yourself, it is common to use a second ramp to walk up, or use a motorcycle stand, or toolbox as a step to help you jump into the back of the truck as you push the bike up the ramp.
Some try to ride their bikes up the ramp. This is fancy, but inevitably ends in a crash resulting in dented truck bed rails, broken back windows, damaged bike, and often an injured person. Save yourself some pain and money and just push your bike hotshot!
Once your bike is in your truck bed, apply the brakes. It’s time to tie down your dirt bike.

Tie Down the Front of Your Bike
Position your bike against the front of the truck bed. Securely hook your straps to the stock anchor points in the truck. There are usually several options in the front of the truck bed.
You will want to attach the straps to the bike somewhere above the suspension. The handlebars are a good spot. Attach the straps to both sides of the handlebars and then tighten the straps. Tighten each side little by little to keep the pressure even on both sides. Make sure you compress the front suspension to prevent the bike from bouncing.
Tie Down the Rear of Your Bike
It is common to only strap down the front of a dirtbike, but the safest method is to secure the rear of the bike as well. Basically repeat the process for strapping down the front of the bike. You will want to connect the straps to the dirt bike frame and connect them to anchor points in the rear of the truck. Some just secure the rear tire of a dirt bike to prevent it from bouncing about.

Repeat the process of pressing down on the suspension to tighten the straps. Tuck the tail ends of the straps in.
Ratchet the Straps
Now, ratchet the straps (or tighten the tie-downs if you are not using ratchet straps). It will help to have a helper press down on the bike as you tighten or ratchet the tie-down straps.

Key Points for Securing Your Dirt Bike on a Truck
- Double-check your truck’s owner’s manual to ensure proper loading and hauling capacity.
- Using tie-down straps often causes undue pressure on fork seals. Overcompression of the suspension may create fork seal leaks, or your fork seals to be damaged.
Now that you know how to secure your dirt bike with straps, you might be wondering if there is an easier way. Straps can be messy and frustrating. Attaching, securing, and tightening the straps every time you want to transport your dirt bike can become a hassle. And if you don’t roll the straps up every single time then they will tie themselves in knots while you aren’t looking.
Luckily, there are ways to transport your dirt bike without the hassle of straps. In this next section, we go through how to secure your dirt bike with a different transport system.
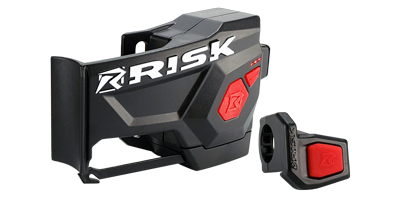
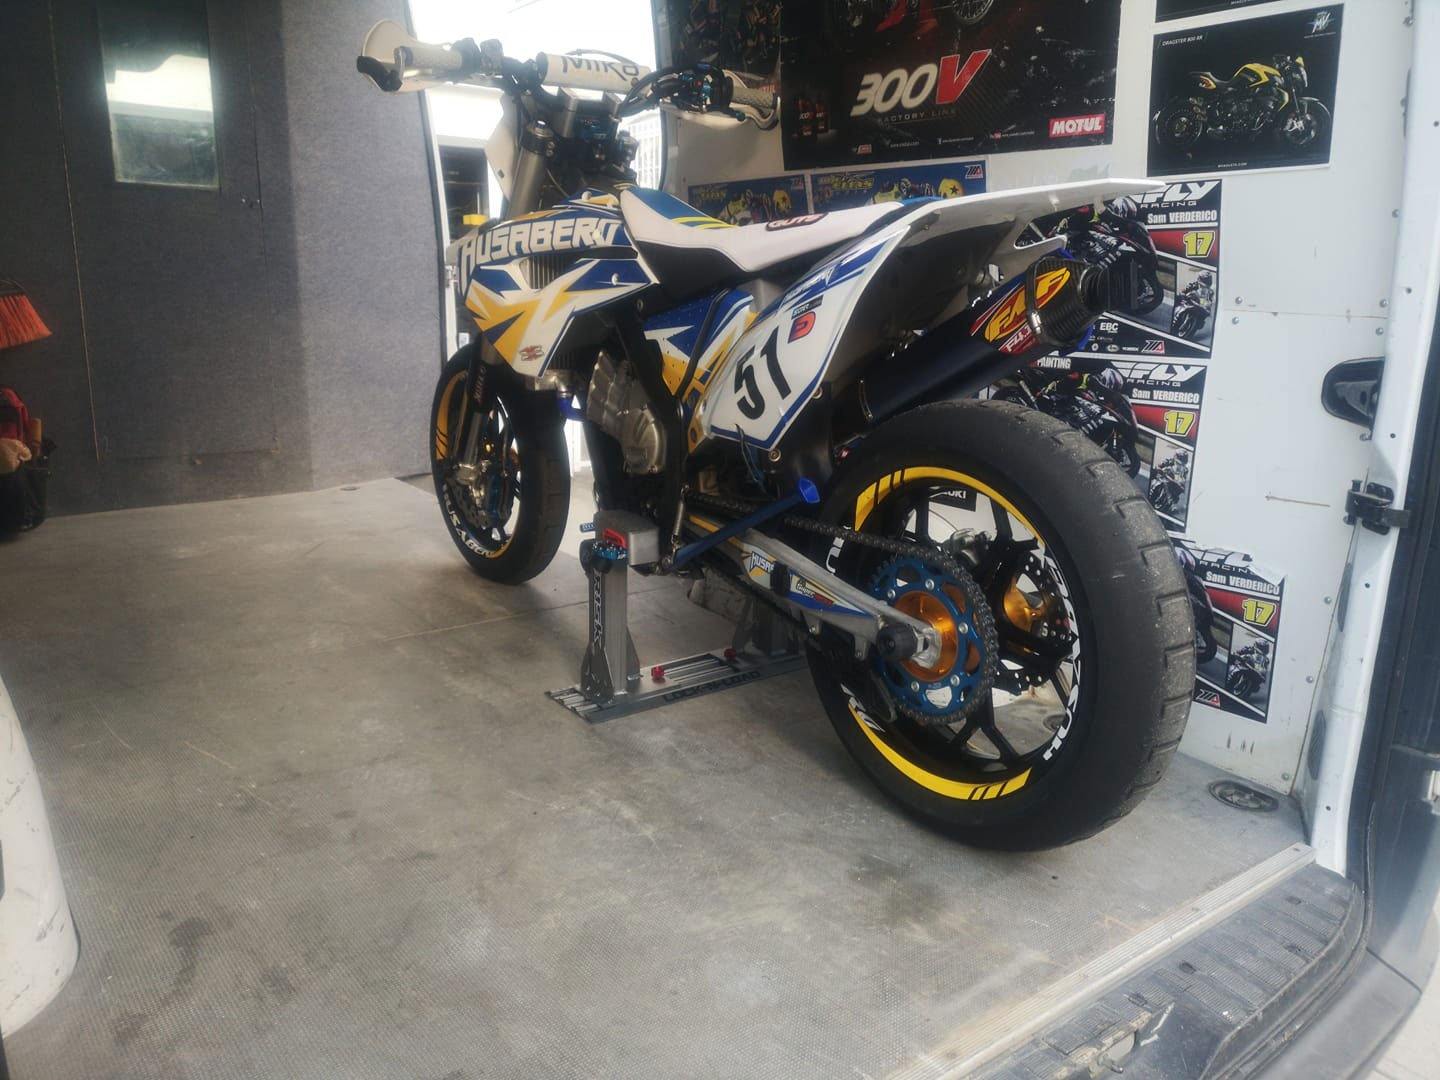
Using the Risk Racing Lock-N-Load Transport System

One of the easiest systems for securing your dirt bike into a trailer is the Lock-N-Load system by Risk Racing. It makes the whole process a breeze.
Risk offers two versions on their best selling dirt bike transport system, The Lock-N-Load and the Lock-N-Load PRO. Each model Lock-N-Load has two sizes. One for full-size bikes and one for smaller bikes. One of the best things about the Lock-N-Load transport system is that it works for trailers, toy haulers, truck beds, Motovans, RV’s, sprinter vans, and pretty much anything you can secure your moto down to.

The Lock-N-Load transport system requires a one-time installation, and then you are good to go whenever you need to transport your bike!
Measure Your Dirt Bike

In order to select the proper Lock-N-Load model, you will want to measure the height of your dirt bike footpegs. This will help you select the proper size and model Lock-N-Load. To measure your dirt bike correctly, you may need to ask a friend or partner for help. Have your friend hold the dirt bike vertically. Make sure it is totally level. While they are holding the bike measure the height of each footpeg.
When you get equal measurements on both sides, you know the bike is perfectly vertical and the measurement is accurate. Use the information on each of the above product pages to select the proper size for your motorcycle. You can also find full installation and videos for each model on the site, but below is a quick overview of the installation and use of the Lock-N-Load PRO model.
The First Step Towards Installation
The first step towards mounting your Lock-N-Load is to position your bike in your truck or trailer as you would like it positioned during transport.
Loosely set the parts for the Lock-N-Load in place essentially doing a dry run so that you can see where the plate needs to be mounted in your truck. After you get it just where you want it, use a marker to mark out right where you need to drill into the installation surface.

Install the Mounting Plate
The mounting plates allow the Lock-N-Load systems to be quick release from the truck or trailer floor. Install the mounting plate into your trailer or truck bed. This requires some drilling. After the one time installation, though, transporting your bike will be streamlined and simple.
To install the mounting plate, you need to drill into the bed of your truck. Drop bolts through the holes and secure with the supplied locknuts. You’ll have to get underneath your truck to install the lock nuts and hold them while a helper in the back of the truck tightens down the bolts.
Installation in a trailer is much easier and quicker as you can screw everything down from the top side. Everything you need to mount the Lock-N-Loads are supplied with your system.
Slide the Lock-N-Loads In
The mounting plates will have slots for the Lock-N-Load transport system. The jaw arms will slide easily into the slots and can be tightened in place using the attached thumbscrew.

Securing The Jaws Down onto Your Footpegs
The transport system comes with jaws that hold your bike in place. Once the system has slid into the mounting plate, raise the jaws. The jaws are fairly large and should fit most bikes.
At this point, you can roll your bike into the transport vehicle and/or trailer and straddle the two Lock-N-Load arms. Once your bike is in place, the jaws should be just over the footpegs of your dirt bike. You can now step on the upper jaws of the Lock-N-Load PRO arms causing them to automatically lock down into place.
When you are ready to release your bike from the Lock-N-Load transport system, Flip the locking switch into the unlock position and step on the top of the jaws, and your bike will be ready for use.

Benefits of the Lock-N-Load Transport System

Frequently Asked Questions (FAQs) About Securing Your Dirt Bike
Now that you know how to secure your dirt bike using two different methods, you still may have questions about the safety or efficiency of each method. Here are some frequently asked questions about dirt bike transportation.
Which Method Is Better for Securing My Bike? Straps or Transport Systems?
![]()
Both straps and strapless transport systems like the Lock-N-Load system will work for transporting your bike. Some people find strapping down your dirt bike every time you use it to be an inconvenience. Other people do not like the idea of drilling into the floor of their trailer or truck.
If you are transporting your dirt bike often, it makes sense to install the Lock-N-Load system. The system is easy to use and doesn’t require the entire process of strapping your bike in and ratcheting it tight every time you want to transport your bike.
It isn’t uncommon for straps to break while the transport systems are made of durable steel and aluminum, making the Lock-N-Load system a more secure and long-lasting method.
Ultimately, both methods are effective. It will come down to your personal preference and how often you are transporting your bike.

Can You Remove the Lock-N-Load Transport System?
The Lock-N-Load can be easily and quickly removed from your trailer floor. Simply loosen the two screws and remove the struts. This will leave only the hardly noticeable mounting plate on your trailer floor.
Do I Need to Use Wheel Chocks When Transporting My Dirt Bike?
Wheel chocks are sturdy wedges made from plastic, rubber, or metal. They are designed to keep the front tire of your bike stable and steady while you are transporting it.
There are several kinds of wheel chocks. There are dirt bike chocks called “stabilizing wheel chocks.” These are designed to prevent the front tire from moving forward. These chocks simply help to keep your bike stable. They still require you to use straps to secure your bike.
Some riders argue that wheel chocks do almost nothing when transporting your bike into a trailer. They argue that you can push the front wheel of your bike against the edge of the trailer, accomplishing the same effect.
In addition to stabilizing wheel chocks, other wheel chocks are meant to stand alone. They were designed to keep your bike steady and stabilized without the additional use of straps.
However, that is a lot of weight to put on a small device. The safest, most secure way to transport your dirt bike is to use straps or a larger system, like the Lock-N-Load transport system.

What Kind of Ramp Should I Use for Loading My Dirt Bike?
If you do not already own a ramp, it is a helpful and important piece of equipment to help you when loading and unloading your dirt bike.
There are a few factors to consider when trying to choose the right ramp. The first, and arguably most important factor is the length of the ramp. A shorter ramp is ok for short trucks, but a longer ramp will really make installation easier in taller or lifted trucks.
Another common option is folding or non-folding ramps. The difference is obvious. Folding helps with storage in the truck as well as in the garage. However, folding ramps can also be awkward to fold and unfold. Some have some very dangerous pinch points. Watch those fingers! Folding ramps cost a little more than non-folding ramps.
Note that you should never ride your bike up a single-runner ramp; they are not built for that, and it is dangerous.

Can I Load My Dirt Bike Without a Ramp?
Yes, you can definitely load your dirt bike without a ramp. It will just be much harder— especially if you’ve tired yourself out riding all day.
If you don’t have a ramp, it will help you have an extra pair of hands. Dirt bikes are heavy, but it is possible to simply lift them into your trailer or truck.
If your bike is too heavy for you to lift, understandably, because most are around 200 Lb’s consider improvising a ramp. You can use a wood plank as a makeshift ramp. Just be sure that you are rolling it up the ramp, not riding it. The wood could easily snap under the pressure of you and the bike, leading to injury.
Another idea to load your bike without a ramp is to position your truck by a hill or in a ditch to match the tailgate with the ground. Although backing your truck into a low spot or ditch might make the transition between the truck bed and ground easier, strapping your bike down at an angle is more difficult and not recommended.

Are There Alternative Ways to Transport a Dirt Bike?
After reading this post, you may be wondering if there are other ways to transport a dirt bike. Straps can be a hassle, and transport systems can be a larger investment. One alternative you may want to consider is a hitch carrier.
Hitch carriers are devices that attach to the back of your vehicle. They attach to the rear of cars, SUVs, and vans. They suspend your motorcycle as you drive and save you the hassle of trailers and straps but also keep in mind the weight load capabilities for your vehicle.
If you think a hitch carrier is for you, be sure to invest in quality. Low quality or cheap hitch carriers can mean disaster for your bike. Dirt bikes are heavy loads, and you will need a hitch carrier that can carry all the weight.
While hitch carriers may be right for some people, they do not offer all the security that comes with securing a dirt bike on a transport system in a truck bed or trailer.
Having an enclosed trailer, motovan, sprinter van, RV or Toyhauler may help ensure your bike’s safety on a whole nother level. They keep your bike sheltered from the weather and other potentially harmful elements. They not only help prevent damage, but they help prevent theft.
Can Tying Down My Bike for Long Periods of Time Cause Damage?
Yes, tightening your straps too tight or for too long of a time period can cause damage to your bike. Part of ensuring your dirt bike won’t move in transport means you have to compress the suspension while securing the tie downs. Also, leaving the forks of your bike compressed for too long can also cause damage to your bike.
To prevent any potential damage, make sure your forks aren’t compressed fully.
If you are going to be transporting your bike for long distances, a system like the Lock-N-Load may cause less stress on your bike.

Conclusion
That is it for this guide. Hopefully, you have learned everything you need to know about transporting and securing your dirt bike.
Leave a comment
Comments will be approved before showing up.