UK/EU▾
Your Cart is Empty


How To Change A Tire On A Dirt Bike?


For many people, changing a dirt bike tire can be a huge pain. That's why most riders don't bother doing so. They figure that it will cost them less to pay a shop to do it than it would cost to replace a destroyed inner tube if they don't know what they're doing. That isn't always the case; however, once you understand the process, changing a tire becomes simple.
Changing a tire on a dirt bike requires only a few things: good tire irons, a wrench set, tire changing lube, and patience. Set your bike on its stand, unmount the wheel, disconnect the inner tube/rim lock, unmount the tire, inspect the rim, then reset the inner tube and tire.
The above method is oversimplified, so let's break it down in more detail and describe the process. Whether you are an expert in need of a refresher, or a novice changing your first tire, this information should get you back on the bike as soon as possible.

Start With Your Tools
Before you even lift your bike off the ground, you will need to make sure that you have the tools for the job. Many riders may not have the funds to afford every device under the sun, so this section will focus on the absolute essentials.
Tire Irons
There are many kinds of tire irons that you can get, but the best place to start is with Spoon Type Tire Irons. While these may look unusual to people who aren't familiar with them, the spoon shape helps you slide it between the tire and the rim without catching on the inner tube. Being thinner also means that they assist the tire in sliding over it onto the wheel.
Tire Lube
There is a lot of conflicting information online in terms of what kind of tire lube to use. Generally speaking, it is always best to use an approved tire mounting lubricant. However, some riders mention using mild vegetable oil or mild soap solution. Never, under any circumstance, use antifreeze, silicones, or petroleum-based lubricants, as these can cause significant damage.
Valve Core Remover
This tool has a particular use, taking out the little rubber and spring valve in the valve stem. When you take out the valve core, it allows the inner tube to deflate completely and helps you take the tire off. This device will also help you prevent pinching the inner tube with your tire iron.
Wrench Set
While these tools are not specific to dirt bikes, a wrench set is essential for the valve stem and rim lock nuts. One recommendation in this category is to get a set with ratcheting closed ends to make working in tight spaces easier.
As mentioned before, this list is not exhaustive, and many other tools can benefit amateurs and experts in changing their dirt bike tires. Still, it’s a great place to start.

Unmounting The Wheel
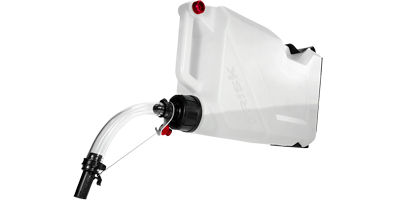
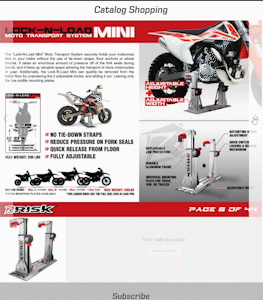
The first step to change your dirt bike tire is to unmount it. Begin by putting your bike on a stand like theATS Adjustable Top Stand by Risk to get the front wheel off of the ground. Continue by removing the axle nut, then loosen the four axle pinch bolts. To remove the axle itself, you can use a T-wrench or a ratchet extension like the one mentioned in the Tools section of this article to push the axle through the fork lugs.
Disconnecting The Inner Tube (And Rim Lock)
Set your newly disconnected wheel on your tire stand or another sturdy surface if you don't have a dedicated mount. You will need to use the valve core tool mentioned above to remove the valve core and leave it out for the rest of the unmounting process. After removing the valve core, take out the valve stem nut.
If your bike has a rim lock, you just need to loosen the nut, but you don't need to remove it. Once you have freed it slightly, press down on the rim lock to make sure it moves easily.
Breaking The Tire Bead From The Rim
Now it's time to unmount the tire. Start by popping the tire off its bead. You will aim to drop the bead of the tire into the center of the rim, which should let the tire move enough that you have room to pull the bead over to the outside of the wheel.
This is the point where the tire lube can come into play if it's sticking. Just spray the tire with some lube and try again.
Lifting The Tire Over The Rim
This step is the most challenging part of changing a dirt bike tire and where you need to be the most patient. Spray both the tire and the rim with plenty of tire lube and begin at the tire's section at the rim lock. Insert your tire irons about four inches apart from each other and work small areas at a time.
Pull The Wheel Through The Tire
Once you have got one side off, flip the tire over, and repeat the process. When you get both sides of your tire outside the wheel, push the wheel down into the tire and then pull it out through the middle of the loosened tire.
Inspection Time
This point of the process is a perfect opportunity to ensure that your rim tape is still in good shape. If dirt or dust gets into the tire, it will act like sandpaper on the inner tube while you're riding, which quickly degrades it.
It's worth noting that it's a good idea to replace your inner tube with every tire change if you have standard inner tubes, as they wear down just like the tires themselves.

Inner Tube and Tire Prep
If you are mounting a brand new tire or re-using an old one, you can add some baby powder into the tire before replacing the inner tube. The powder will act as a dry lubricant and will assist with preventing friction wearing the tube down.
Placing The Inner Tube On The Wheel
Pull the valve stem through the hole in the rim, then tighten the valve stem nut, as this will hold the tube in place. Then re-insert the valve stem core.
Setting The Tire On The Wheel
Using your tire irons, you will want to set the tire bead between the rim lock and the rim itself. Doing so will allow the tire bead to go into the lower drop center, which helps you pull the tire over. Then work the rest of the tire onto the wheel, and use your tire iron to lift the last section over the rim.
Mounting The Rest Of The Tire
Beginning at the rim lock, push your tire down into the drop center of the wheel. Ensure that the rim lock is out of the way, and then work the tire around with the tire irons. This part is challenging, so use plenty of lube and be patient.

Inflate Your Inner Tube To Set The Bead
Tighten down your valve stem and inflate the inner tube to set the bead. You will need to over-inflate the tire slightly to get the bead to pop on. After the bead sets, deflate your tire to twelve to fifteen psi and then tighten your rim lock.
Mounting The Wheel
The final step in your dirt bike tire change is re-mounting the wheel to the bike! This step is one of the easier ones, but I recommend spreading the brake pads with a flat-head screwdriver. Doing so helps to prevent the fork from spinning while you line up the brake disk.
You Made It
Changing a tire on your dirt bike may seem overwhelming at first, but you will be amazed at how much money you save by not needing to go to the local shop. Above all, be patient and research your exact make and model to see any differences you need to know, then enjoy the trails!
Leave a comment
Comments will be approved before showing up.